This is a table that compare decimal numbers, ArtNet, Hex and ASCII.


// help.malighting.com


# cmake 설치
yum install cmake28

# ipsumdump 설치
wget http://www.read.seas.harvard.edu/~kohler/ipsumdump/ipsumdump-1.85.tar.gz
tar -zxvf ipsumdump-1.85.tar.gz  
cd ipsumdump-1.85 
./configure 
make && make install

# 기타 필요 모듈 설치
yum install kernel-devel kernel-headers -y 
yum install make autoconf automake gcc gcc-c++ flex bison libpcap libpcap-devel -y 
yum install openssl openssl-devel python-devel swig zlib zlib-devel -y 
yum install openssl-libs bind-libs -y 
yum install gawk -y 
yum install pcre-devel -y  
yum install libtool -y   
yum install numactl numactl-devel -y  
yum install gperftools-libs gperftools-devel -y  
yum install GeoIP GeoIP-devel -y  
yum install jemalloc jemalloc-devel 
yum install curl 
yum install libcurl-devel 
or
yum install cmake make gcc gcc-c++ flex bison libpcap-devel openssl-devel python-devel swig zlib-devel perl
yum install GeoIP-devel

wget http://www.read.seas.harvard.edu/~kohler/ipsumdump/ipsumdump-1.85.tar.gz

# PF_RING 설치
wget http://downloads.sourceforge.net/project/ntop/PF_RING/PF_RING-6.0.3.tar.gz?r=http%3A%2F%2Fsourceforge.net%2Fprojects%2Fntop%2Ffiles%2FPF_RING%2F&ts=1444096722&use_mirror=jaist

# mv PF_RING-6.0.3.tar.gz\?r\=http\:%2F%2Fsourceforge.net%2Fprojects%2Fntop%2Ffiles%2FPF_RING%2F PF_RING-6.0.3.tar.gz
# tar xvfz PF_RING-6.0.3.tar.gz
# cd PF_RING-6.0.3/userland/lib
# ./configure —prefix=/opt/pfring
   ==> libnuma 관련 에러메세지가 나올 경우 아래와 같이 심볼릭 링크 설정 
# cd /usr/lib64
# ln -s ./libnuma.so.1 /usr/lib64/libnuma.so
# make install

# cd ../libpcap
# ./configure --prefix=/opt/pfring
# make install

# cd ../tcpdump-4.1.1/
# ./configure --prefix=/opt/pfring
# make install

# cd ../../kernel/
# make
# make install
insmod ./pf_ring.ko
modprobe pf_ring enable_tx_capture=0 min_num_slots=32768 

export CFLAGS=-I/usr/local/include
export LDFLAGS=-L/usr/local/lib

# wget https://www.bro.org/downloads/archive/bro-2.4.tar.gz
# tar xvfz bro-2.4.tar.gz
# ./configure --with-pcap=/opt/pfring
# make
# make install


libpcap 라이브러리 링크 확인
# ldd /usr/local/bro/bin/bro | grep pcap
    libpcap.so.1 => /usr/lib/libpcap.so.1 (0x0000003471e00000)

#vi http-add-post-bodies.bro
  ==> 아래 내용 삽입

# cp ./http-add-post-bodies.bro /usr/local/bro/share/bro/base/protocols/http/
# cd /usr/local/bro/share/bro/base/protocols/http/
# vi __load__.bro

@load ./main
@load ./entities
@load ./utils
@load ./files
@load ./http-add-post-bodies <=  추가

@load-sigs ./dpd.sig 


'Server' 카테고리의 다른 글

User Agent 별 점유율  (0) 2018.03.29
CentOS 7 관리 - APM : Apache, PHP, MariaDB 설치  (0) 2017.07.11
nslookup, dig 사용하기  (0) 2017.01.08
umask란?  (0) 2017.01.08
Linux 사용자 계정  (0) 2017.01.08

자동 시작 Registry 위치

  1. HKEY_LOCAL_MACHINE\Software\Microsoft\Windows\CurrentVersion\Run\
    All values in this key are executed.

  2. HKEY_LOCAL_MACHINE\Software\Microsoft\Windows\CurrentVersion\RunOnce\
    All values in this key are executed, and then their autostart reference is deleted.

  3. HKEY_LOCAL_MACHINE\Software\Microsoft\Windows\CurrentVersion\RunServices\
    All values in this key are executed as services.

  4. HKEY_LOCAL_MACHINE\Software\Microsoft\Windows\CurrentVersion\RunServicesOnce\
    All values in this key are executed as services, and then their autostart reference is deleted.

  5. HKEY_CURRENT_USER\Software\Microsoft\Windows\CurrentVersion\Run\
    All values in this key are executed.

  6. HKEY_CURRENT_USER\Software\Microsoft\Windows\CurrentVersion\RunOnce\
    All values in this key are executed, and then their autostart reference is deleted.

  7. HKEY_CURRENT_USER\Software\Microsoft\Windows\CurrentVersion\RunOnce\Setup\
    Used only by Setup. Displays a progress dialog box as the keys are run one at a time.

  8. HKEY_USERS\.Default\Software\Microsoft\Windows\CurrentVersion\Run\
    Similar to the Run key from HKEY_CURRENT_USER.

  9. HKEY_USERS\.Default\Software\Microsoft\Windows\CurrentVersion\RunOnce\
    Similar to the RunOnce key from HKEY_CURRENT_USER.

  10. HKEY_LOCAL_MACHINE\Software\Microsoft\Windows NT\CurrentVersion\Winlogon
    The "Shell" value is monitored. This value is executed after you log in.

  11. HKEY_LOCAL_MACHINE\Software\Microsoft\Active Setup\Installed Components\
    All subkeys are monitored, with special attention paid to the "StubPath" value in each subkey.

  12. HKEY_LOCAL_MACHINE\System\CurrentControlSet\Services\VxD\
    All subkeys are monitored, with special attention paid to the "StaticVXD" value in each subkey.

  13. HKEY_CURRENT_USER\Control Panel\Desktop
    The "SCRNSAVE.EXE" value is monitored. This value is launched when your screen saver activates.

  14. HKEY_LOCAL_MACHINE\System\CurrentControlSet\Control\Session Manager
    The "BootExecute" value is monitored. Files listed here are Native Applications that are executed before Windows starts.

  15. HKEY_CLASSES_ROOT\vbsfile\shell\open\command\
    Executed whenever a .VBS file (Visual Basic Script)  is run.

  16. HKEY_CLASSES_ROOT\vbefile\shell\open\command\
    Executed whenever a .VBE file (Encoded Visual Basic Script) is run.

  17. HKEY_CLASSES_ROOT\jsfile\shell\open\command\
    Executed whenever a .JS file (Javascript) is run.

  18. HKEY_CLASSES_ROOT\jsefile\shell\open\command\
    Executed whenever a .JSE file (Encoded Javascript) is run.

  19. HKEY_CLASSES_ROOT\wshfile\shell\open\command\
    Executed whenever a .WSH file (Windows Scripting Host) is run.

  20. HKEY_CLASSES_ROOT\wsffile\shell\open\command\
    Executed whenever a .WSF file (Windows Scripting File) is run.

  21. HKEY_CLASSES_ROOT\exefile\shell\open\command\
    Executed whenever a .EXE file (Executable) is run.

  22. HKEY_CLASSES_ROOT\comfile\shell\open\command\
    Executed whenever a .COM file (Command) is run.

  23. HKEY_CLASSES_ROOT\batfile\shell\open\command\
    Executed whenever a .BAT file (Batch Command) is run.

  24. HKEY_CLASSES_ROOT\scrfile\shell\open\command\
    Executed whenever a .SCR file (Screen Saver) is run.

  25. HKEY_CLASSES_ROOT\piffile\shell\open\command\
    Executed whenever a .PIF file (Portable Interchange Format) is run.

  26. HKEY_LOCAL_MACHINE\System\CurrentControlSet\Services\
    Services marked to startup automatically are executed before user login.

  27. HKEY_LOCAL_MACHINE\System\CurrentControlSet\Services\Winsock2\Parameters\Protocol_Catalog\Catalog_Entries\
    Layered Service Providers, executed before user login.

  28. HKEY_LOCAL_MACHINE\System\Control\WOW\cmdline
    Executed when a 16-bit Windows executable is executed.

  29. HKEY_LOCAL_MACHINE\System\Control\WOW\wowcmdline
    Executed when a 16-bit DOS application is executed.

  30. HKEY_LOCAL_MACHINE\Software\Microsoft\Windows NT\CurrentVersion\Winlogon\Userinit
    Executed when a user logs in.

  31. HKEY_LOCAL_MACHINE\Software\Microsoft\Windows\CurrentVersion\ShellServiceObjectDelayLoad\
    Executed by explorer.exe as soon as it has loaded.

  32. HKEY_CURRENT_USER\Software\Microsoft\Windows NT\CurrentVersion\Windows\run
    Executed when the user logs in.

  33. HKEY_CURRENT_USER\Software\Microsoft\Windows NT\CurrentVersion\Windows\load
    Executed when the user logs in.

  34. HKEY_CURRENT_USER\Software\Microsoft\Windows\CurrentVersion\Policies\Explorer\run\
    Subvalues are executed when Explorer initialises.

  35. HKEY_LOCAL_MACHINE\Software\Microsoft\Windows\CurrentVersion\Policies\Explorer\run\
    Subvalues are executed when Explorer initialises.


Folder Autostart Locations

  1. windir\Start Menu\Programs\Startup\

  2. User\Startup\

  3. All Users\Startup\

  4. windir\system\iosubsys\

  5. windir\system\vmm32\

  6. windir\Tasks\


    File Autostart Locations

  1. c:\explorer.exe 

  2. c:\autoexec.bat

  3. c:\config.sys

  4. windir\wininit.ini

  5. windir\winstart.bat

  6. windir\win.ini - [windows] "load"

  7. windir\win.ini - [windows] "run"

  8. windir\system.ini - [boot] "shell"

  9. windir\system.ini - [boot] "scrnsave.exe"

  10. windir\dosstart.bat

  11. windir\system\autoexec.nt

  12. windir\system\config.nt


[root@s92 etc]# nslookup
www.ttl.co.kr
Server:         211.63.64.11 우리꺼 네임서버
Address:        211.63.64.11#53 (포트)

Non-authoritative answer:
Name:   www.ttl.co.kr
Address: 203.236.17.23

> set querytype=ns
www.ttl.co.kr
Server:         211.63.64.11
Address:        211.63.64.11#53

Non-authoritative answer:
ttl.co.kr       nameserver = gate.sktelecom.com.
ttl.co.kr       nameserver = gate2.sktelecom.com.

Authoritative answers can be found from:
gate.sktelecom.com      internet address = 203.236.1.12
gate2.sktelecom.com     internet address = 203.236.20.11
>

> set querytype=mx
> ttl.co.kr
Server:         211.63.64.11
Address:        211.63.64.11#53

Non-authoritative answer:
ttl.co.kr       mail exchanger = 100 mail.ttl.co.kr.

Authoritative answers can be found from:
ttl.co.kr       nameserver = gate.sktelecom.com.
ttl.co.kr       nameserver = gate2.sktelecom.com.
mail.ttl.co.kr  internet address = 203.236.1.25
gate.sktelecom.com      internet address = 203.236.1.12
gate2.sktelecom.com     internet address = 203.236.20.11
>

> set querytype=ay
unknown query type: ay
> setquerytpye=ay
Server:         211.63.64.11
Address:        211.63.64.11#53

** server can't find setquerytpye=ay: NXDOMAIN
> naver.com
Server:         211.63.64.11
Address:        211.63.64.11#53

Non-authoritative answer:
naver.com       mail exchanger = 10 rcvmail4.naver.com.
naver.com       mail exchanger = 10 rcvmail5.naver.com.
naver.com       mail exchanger = 10 rcvmail1.naver.com.
naver.com       mail exchanger = 10 rcvmail2.naver.com.
naver.com       mail exchanger = 10 rcvmail3.naver.com.

Authoritative answers can be found from:
naver.com       nameserver = ns1.naver.com.
naver.com       nameserver = ns2.naver.com.
rcvmail4.naver.com      internet address = 220.73.146.166
rcvmail5.naver.com      internet address = 211.218.150.164
rcvmail1.naver.com      internet address = 211.218.150.166
rcvmail2.naver.com      internet address = 220.73.146.164
rcvmail3.naver.com      internet address = 220.73.146.165
ns1.naver.com   internet address = 211.218.150.38
ns2.naver.com   internet address = 211.218.150.37

[root@s92 etc]# nslookup -type=any leopit.com
Server:         211.63.64.11
Address:        211.63.64.11#53

Non-authoritative answer:
leopit.com      nameserver = ns.leopit.com.
Name:   leopit.com
Address: 211.238.132.91
leopit.com      mail exchanger = 10 211.238.132.91.leopit.com.

Authoritative answers can be found from:
leopit.com      nameserver = ns.leopit.com.

[root@s92 etc]# host -v -t ns naver.com
Trying "naver.com"
;; ->>HEADER<<- opcode: QUERY, status: NOERROR, id: 59820
;; flags: qr rd ra; QUERY: 1, ANSWER: 2, AUTHORITY: 0, ADDITIONAL: 2

;; QUESTION SECTION:
;naver.com.                     IN      NS

;; ANSWER SECTION:
naver.com.              2191    IN      NS      ns2.naver.com.
naver.com.              2191    IN      NS      ns1.naver.com.

;; ADDITIONAL SECTION:
ns2.naver.com.          171391  IN      A       211.218.150.37
ns1.naver.com.          171391  IN      A       211.218.150.38

Received 95 bytes from 211.63.64.11#53 in 158 ms
[root@s92 etc]#

:: dig - 내가 사용할 네임서버를 지정해야함)
[root@s92 etc]# dig @ns.bora.net kldp.org A

; <<>> DiG 9.2.4 <<>> @ns.bora.net kldp.org A
;; global options:  printcmd
;; Got answer:
;; ->>HEADER<<- opcode: QUERY, status: NOERROR, id: 13148
;; flags: qr rd ra; QUERY: 1, ANSWER: 1, AUTHORITY: 1, ADDITIONAL: 0

;; QUESTION SECTION:
;kldp.org.                      IN      A

;; ANSWER SECTION:
kldp.org.               60      IN      A       210.118.94.78

;; AUTHORITY SECTION:
kldp.org.               60      IN      NS      ns.kldp.org.

;; Query time: 123 msec
;; SERVER: 164.124.101.2#53(ns.bora.net) - 내가 지정한 네임서버
;; WHEN: Fri Nov 25 10:46:01 2005
;; MSG SIZE  rcvd: 59

[root@s92 etc]#

'Server' 카테고리의 다른 글

CentOS 7 관리 - APM : Apache, PHP, MariaDB 설치  (0) 2017.07.11
CentOS에서 BRO+PF_RING 설치하기  (0) 2017.01.09
umask란?  (0) 2017.01.08
Linux 사용자 계정  (0) 2017.01.08
이메일 오픈릴레이 테스트  (0) 2017.01.08

1. umask란?

솔라리스에서는 여러 가지 환경 설정 파일을 제공하는데, 이것은 사용자를 더욱 자유롭고 융통성 있게 만들어 준다. 
이런 파일들은 보통 홈디렉토리안에 위치하고 있으며, '.'으로 시작 하는 파일들을 말한다. 
'ls -a' 명령으로 파일의 존재를 확인할 수 있으며, 파일의 이름은 "Resource Configuration"이라는 의미의 
"rc"라는 스펠링으로 끝나는 경우가 많다. 
Umask는 처음 파일이나 디렉토리를 만들면 파일이나 디렉토리에 대한 기본적인 권한(permission)이 자동설정 되는데, 이러한 것은 
시스템파일의 umask에 의하여 결정이 된다. 
umask는 .profile, .cshrc, .bashrc, .login과 같은 사용자 프로파일에서 설정한다.


2. umask의 사용


가) umask는 chmod와는 정반대의 개념으로 사용된다. 예를 들어, chmod 022라는 명령어가 해당 그룹 및 다른 사용자들에게 
쓰기권한을 부여하지만, umask 022는 해당 그룹 및 다른 사용자들에게 쓰기권한을 박탈하는 것이다. 


나) 파일이나 디렉토리를 만들 때마다, 접근권한은 미리 지정한 값으로 정해집니다. 이 값은 파일 생성 모드 
마스크에 의하여 정의된다. 이 마스크 값을 살펴보려면 다음과 같은 명령을 사용한다.


#umask

077


다) umask명령의 결과로 077이라는 숫자 세 개가 보여지는데, 가끔 0이 생략되기도 
한다.
이 숫자값은 파일의 경우 666, 디렉토리의 경우 777을 빼어, 초기 접근 권한값을 파악하는 데, 
사용된다.


라) 마스크 값을 바꾸기


전체 시스템에 영향을 미치기 위해서는 /etc/profile 파일에 umask 값을 수정해줘야 
한다. 49라인쯤에 umask 022 비스무레한 것이 있을 것이다. 그 값을 수정해주면 된다.


현재 접속되어 있는 쉘에 대해서만 일회성으로 바로잡으려면 다음과 같은 명령을 
수행해준다.

#umask nnn

'Server' 카테고리의 다른 글

CentOS에서 BRO+PF_RING 설치하기  (0) 2017.01.09
nslookup, dig 사용하기  (0) 2017.01.08
Linux 사용자 계정  (0) 2017.01.08
이메일 오픈릴레이 테스트  (0) 2017.01.08
실제예(passwd명령어)로 SetUID, SetGID 이해하기  (0) 2017.01.08

관련커맨드 : useradd, usermod, /etc/passwd, /etc/shadow, /etc/default/useradd
 

/etc/default/useradd (사용자를 추가할때 기본설정환경을 부여해주는 파일) 

# useradd defaults file
GROUP=100
HOME=/home
INACTIVE=-1
EXPIRE=
SHELL=/bin/bash
SKEL=/etc/skel<?-ml:namespace prefix = o ns = "urn:schemas-microsoft-com:office:office" /><?XML:NAMESPACE PREFIX = O />

 
GROUP 100 : 기본적으로 사용자/그룹 같게 생성.
HOME=/home : 홈디렉토리
INACTIVE=-1 : 사용자생성시 패스워드생성하지않았을때 Lock를 걸어준다는 기본설정옵션(변경시 0,1로 변경)
EXPIRE : 패스워드 만료시간(공백은 기본설정 기본 : 99999)
SHELL=/bin/bash : 기본 쉘 설정
SKEL=/etc/skel : 기본 사용자에 대한 설정


[root@host3 root]# ls -l /usr/sbin/adduser 

lrwxrwxrwx 1 root root 7 8월 28 02:29 /usr/sbin/adduser -> useradd

[root@host3 root]#


 useradd

[-c comment] 코멘트
[-d home_dir] 사용자디렉토리
[-e expire_date] 유효기간
[-f inactive_time] 비활성일수 - 패스워드 만료후 계정이 영구히 말소될때까지의 기간
[-g initial_group] 기본그룹
[-G group[,...]] 보조그룹
[-m [-k skeleton_dir] | -M] - 사용자 디렉토리가 존재하지 않을때만 생성
[-p passwd]
[-s shell] 
[-u uid [ -o]] 
[-n] 사용자 계정추가 기본모드를 지정하지 않을때 
[-r] login

[root@host3 root]# useradd -c 박성수 -e 2004-12-12 -d /home/sspark2 -u 601 -s /bin/ksh -p 12345 sspark2

위에서 사용한 옵션을 간단히 설명하면 다음과 같다.

 . -c 박성수 : 계정사용자의 간단한 설명
 . -e 2004-12-12 : 계정사용 종료일자
 . -d /home/sspark2 : 홈디렉토리 위치
 . -u 601 : UID 601로 지정
 . -s /bin/ksh : 사용할 기본쉘을 Korn Shell로 지정
 . -p 12345 : 패스워드를 12345로 지정
 . -D : 현재 default로 설정 되어 있는 값들을 보여줌 (/etc/default/useradd 에 정의)
 . sspark2 : 생성할 계정명
[root@s92 ~]#


 usermod

[-c comment]
[-d home_dir [ -m]]
[-e expire_date] 
[-f inactive_time]
[-g initial_group] 
[-G group[,...]]
[-l login_name] [-p passwd]
[-s shell] 
[-u uid [ -o]] 
[-L|-U] login

'Server' 카테고리의 다른 글

nslookup, dig 사용하기  (0) 2017.01.08
umask란?  (0) 2017.01.08
이메일 오픈릴레이 테스트  (0) 2017.01.08
실제예(passwd명령어)로 SetUID, SetGID 이해하기  (0) 2017.01.08
iptables  (0) 2017.01.08
Scapy

지금까지 패킷분석과 관련한 많은 도구들을 언급하였는데, 이 도구를 미처 소개하지 못했다.
강력한 기능과 프로그램적인 면에서도 뛰어난 도구인데말이다. 필자가 오늘 소개하고자 하는 도구는
Scapy 라는 것이다. Scapy 는 인터렉티브하게 패킷을 조작할 수 있는 강력한 기능을 제공하며,
수 많은 프로토콜의 디코딩 기능과 수정된 패킷을 전송할 수 있는 기능등을 포함하고 있다.

이 도구의 큰 장점은 다양한 기능을 수행할 수 있는 것인데, 우리가 흔히 스캐닝을 하거나, 패킷덤프를
하거나, 원격 시스템의 Alive 유무를 점검 또는 공격 패킷등을 만들고자 할때 사용하는 도구들이
다 달라진다. 예를 들면, hping, nmap, arpsoof, tcpdump, tshark, p0f 등의 여러 도구의 기능들 말이다
하지만 Scapy 는 이 도구 하나로 가능하다. 너무 강력한 도구인양 소개한 것일까?

사용용도에 따라 달라지겠지만 무척이나 편리한 기능을 갖고 있는 것은 사실이다. 다만 사용하는데 있어서는
일반적인 도구에 비해서는 사용방법이 처음에는 힘들 수도 있다. Scapy 는 파이썬을 기반으로
작성되어 있는데, 사용형태가 파이썬에서 코드를 사용하는 것과 같이 사용할 수 있으므로
파이썬에 익숙해져 있는 사용자라면 더 없이 편할 것이다. 또한, Scapy 모듈을 이용하여,
파이썬에서 패킷을 핸들링 하는 프로그램을 작성한다면 간단하게 그 기능을 이용할 수 있어
개발자 관점에서도 유용하다.

뛰어나다는 설명보다도 일단 직접 경험해 보는 것이 빠르다.  바로 설치해 보고 각 기능을
사용해 보면 앞서 얘기한 것들이 이해가 될 것이다.

1. 설치

Scapy 2.x 이상의 버전에서는 파이썬 2.5 이상이 필요하다. 그리고 libpcap, libdnet 이 필요하다.
보통 많은 경우에는 이런것들이 이미 설치되어 있으므로 사용하는데 큰 문제는 없을 것이다.

다음의 경로에서 파일을 다운로드 받을 수 있다:


$ unzip scapy-latest.zip
$ cd scapy-2.*
$ sudo python setup.py install

하는 것으로 쉽게 설치가 된다. 파이썬에 익숙한 사용자라면 어렵지 않을 것이다. 또는,
각 시스템에서 제공하는 패키지가 있다면 그것을 이용해도 좋다.

# apt-get install scapy

* 참고로 윈도우 기반에서 사용하고자 한다면, 다음의 문서를 참고하여 실행해 보길 바란다.

2. 간단한 사용 예

실행하게 되면 다음과 같은 화면을 볼 수 있다.

# scapy
WARNING: No route found for IPv6 destination :: (no default route?)
Welcome to Scapy (2.1.0)
>>>

(설치되어 있는 모듈 및 환경에 따라, 경고 메시지가 뜰 수 있는데 무시하고 사용 가능하다.단, 해당 모듈 기능을 사용하지 않는 한)

몇 가지 간단한 기능을 살펴보자!

>>> ls()
ARP        : ARP
BOOTP      : BOOTP
CookedLinux : cooked linux
DHCP       : DHCP options
DNS        : DNS
DNSQR      : DNS Question Record
DNSRR      : DNS Resource Record
....
현재 지원하는 레이어 형태를 볼 수 있다. 쉽게 보면 프로토콜 이다.

다음은 존재하는 PCAP 파일을 오픈하는 것이다. 오픈할 파일을 " 없이 사용하는 경우는 다른 형태로 이해한다.
오픈 후에는 파싱되어 메모리 상에 다 들어가 있으므로 바로 바로 필요한 내용을 꺼내 사용할 수 있다.

>>> a=rdpcap(test.pcap)
Traceback (most recent call last):
  File "<console>", line 1, in <module>
NameError: name 'test' is not defined
>>> a=rdpcap("test.pcap")
>>> a
<test.pcap: TCP:2040 UDP:0 ICMP:0 Other:0>
>>>

파일 전송도 할 수 있는데, 원하는 형태로 마음대로 수정하여 전송이 가능하다. 각 프로토콜 레이어 별로 정보를 기록하고 헤더를 붙일 수 있다. 아래의 경우는 IP 헤더에서 목적지를 1.2.3.4 로 설정하고, ICMP 헤더를 붙인 것이다.

>>> send(IP(dst="1.2.3.4")/ICMP())
.
Sent 1 packets.

전송하기 전 tcpdump 로 확인한 내용을 보면, 목적지 1.2.3.4 로 ICMP 패킷이 전송된걸 확인할 수 있다.

# tcpdump -v icmp
tcpdump: listening on eth0, link-type EN10MB (Ethernet), capture size 96 bytes
09:07:36.479199 IP (tos 0x0, ttl 64, id 1, offset 0, flags [none], proto ICMP (1), length 28) packet > 1.2.3.4: ICMP echo request, id 0, seq 0, length 8

이 정도에서 간단한 맛보기를 언급하고 다음 이어지는 두번째 편에서 좀더 세부적으로 Scapy 기능을 알아보도록 하겠다. 계속 이것저것 소개할 것이 많은데, 정리하고 쓰자니 시간이 꽤 걸리는 거 같다. 이래서 정리는 인내가 필요해지는 것 같다 :-)


<script type="text/javascript" src="http://ss.textcube.com/service/blog/script/blogger.js"></script>

네트워크 패킷을 인젝션하고 캡쳐할 수 있는 도구 Packit(Packet toolkit) 을 소개한다.
앞서 소개했던 많은 도구들과 같이 인젝션하기에 유용한 도구이다.

TCP,UDP,ICMP,IP,ARP,RARP 그리고 이더넷 헤더등 거의 모든 것을 정의할 수 있어,
방화벽, 침입탐지시스템, 트래픽 테스트와 같은 곳에 이용할 때 유용하게 사용될 수 있을 것이다.
Packit 의 버전은 현재 1.0 이며 설치를 하기 위해서는 libnet 1.1.2 이상의 라이브러리와
libpcap 라이브러리또한 필요하다.

소스파일의 다운로드는 다음의 경로에서 할 수 있다:

APT 패키지 사용자라면,
# apt-get install packit 으로 쉽게 설치도 가능하다.

사용에는 큰 어려움이 없으나, 다만 옵션이 상당히 많다. 이 뜻은 세부적으로
정의할 수 있다는 뜻이된다. 기본 사용방법은 아래와 같다:

usage: packit -m mode [-options] 'expression'

사용할 때 모드가 있다는 것을 주의해야 하는데, 모드에 따라서 옵션이 달라지기 때문이다.
옵션에는 capture, inject, trace 가 있으며 기본모드는 inject 이다.

1. 패킷 캡쳐

자주 사용할 만한 패킷 캡쳐 옵션 몇가지를 정리해 보면 아래와 같다

-c count 캡쳐할 카운트 수를 지정
-e 링크 레이어 헤더 데이터 출력
-i interface 네트워크 인터페이스 지정
-n 호스트 주소를 이름으로 변환하지 않음
-r file 패킷을 읽을 파일 지정
-s snaplen 패킷 캡쳐할 snaplen 데이터 사이즈 정의 (기본:68 바이트)
-w file 패킷 파일 저장
-X 헥사와 아스키로 데이터 출력

사용 옵션들을 보면 패킷인사이드에서 여러번 다뤘던 도구들과 큰 차이는 없다.
특히 tcpdump 에 익숙하다면 더욱 그럴것이다.

사용예제>

#packit -m capture -c 100 -i eth0 -w /data/packetinside.pcap
#packit -m cap -nX 'tcp and port 80'

2. 패킷 인젝션

기본적으로 인젝션 되는 패킷의 옵션은 아래와 같으며, 옵션만 봐도 크게 어렵지는 않다.

-t protocol 인젝트할 프로토콜 타입 지정 : TCP, UDP, ICMP, ARP (기본은 TCP)
-c count 인젝션에 몇 개의 패킷을 사용할 것인지 정의
-i interface 네트워크 인터페이스
-w interval 각 패킷을 보내는 간격 시간 (기본 : 1초)
-h 패킷을 보낸 후, 응답을 프린트 해줌 * 필요에 따라 유용한 기능
-v Verbose 모드로 세부적으로 정보를 출력함
-p payload 인젝션 할 페이로드를 지정, HEX 는 '0x' 로 시작하며 각 값의 구분은 공백으로 함
ASCII : -p 'hello world, packetinside.com'
HEX: -p '0x 40 40 40 90 90 90 0d 0a'
-Z length 인젝트할 패킷의 사이즈 정의

-t 로 프로토콜을 지정한 후 각 프로토콜 마다 사용가능한 옵션을 이용하면 되는데
IP,TCP,UDP,ICMP,ARP,이더넷 헤더 옵션을 가지고 있다.
여기서 각 옵션을 일일이 설명하기는 힘들고, packit 의 간단한 도움말을 보면 쉽게 알 수 있다.

TCP/UDP header options
  -a ack      Acknowledgement number
  -D port     Destination port (Range format: start-end)
  -F flags    Flags (format: -F UAPRSF)
  -q seq      Sequence number
  -S port     Source port (Default: Random)
  -u urg      Urgent pointer
  -W size     Window size (Default: 65535)

ICMPv4 header options
  General:
  -C code     Code (Default: 0)
  -K type     Type (Default: 8)

  Echo(0) / Echo Reply(8):
  -N id       ID number
  -Q seq      Sequence number

  Unreachable(3) / Redirect(5) / Time Exceeded(11):
  -g gateway  Redirect gateway host (ICMP Redirect only)
  -j address  Original source address
  -J port     Original source port
  -l address  Original destination address
  -L port     Original destination port
  -m ttl      Original time to live
  -M id       Original ID number
  -O tos      Original type of service
  -P proto    Original protocol (Default: UDP)

  Mask Request(17) / Mask Reply(18):
  -N id       ID number
  -Q seq      Sequence number
  -G mask     Address mask

  Timestamp Request(13) / Timestamp Reply(14):
  -N id       ID number
  -Q seq      Sequence number
  -U ts       Original timestamp
  -k ts       Recieved timestamp
  -z ts       Transmit timestamp

IP header options
  -d address  Destination address
  -f          Don't fragment
  -n id       ID number
  -o tos      Type of service
  -s address  Source address
  -T ttl      Time to live (Default: 128)
  -V ipproto  IP protocol number (RAWIP only)

ARP header options
  -A op       Operation type (Default: 1 (ARP request))
  -x address  Source protocol address
  -X hwaddr   Source hardware address
  -y address  Destination protocol address
  -Y hwaddr   Destination hardware address

Ethernet header options
  -e ethaddr  Source ethernet address
  -E ethaddr  Destination ethernet address

옵션은 위와 같으며, 패킷인사이드 블로그를 열심히 보신 분들이라면 옵션을 이해하는데 
어려움이 없을 것이다. 몇가지 예제를 보도록 하자.

다음은 출발지 소스는 8.8.1.1 로 하고 목적지는 192.168.0.1 로 보내는데 총 10개의 패킷을
보낸다. -h 옵션은 응답도 출력하도록 한 것이다. -h 옵션이 주어지지 않으면,
단순히 전송하는 정보만 출력할 것이다.

# packit -t icmp -s 8.8.1.1 -d 192.168.0.1 -c 10  -h
Mode:  Packet Injection using device: eth1

-| SND 1 |------------------------------------------------------------------

Timestamp:   10:28:54.469954
ICMP header: Type: Echo Request(8)  ID: 5854  Seqn: 56577  
IP header:   Src Address: 8.8.1.1  Dst Address: 192.168.0.1
    TTL: 128  ID: 53261  TOS: 0x0  Len: 28  

-| No Response From Peer |--------------------------------------------------

아래는 TCP 패킷을 보내는 것으로 목적지 포트 80에 TTL은 111 그리고 페이로드는 0x40 을
보낸 것이다.

# packit -t TCP -s 192.168.0.253 -d 192.168.0.200 -S 403 -D 80 -T 111 -p '0x 40'
Mode:  Packet Injection using device: eth1

TCP header:  Src Port: 403  Dst Port(s): 80  Flag(s): None
    Window: 65535  
IP header:   Src Address: 192.168.0.253  Dst Address: 192.168.0.200
    TTL: 111  ID: 49354  TOS: 0x0  Len: 41  

Writing packet(s) (1): .

-| Packet Injection Statistics |--------------------------------------------
Injected: 1  Packets/Sec: 1.0  Bytes/Sec: 41.0  Errors: 0

그리고 다음은 ARP 패킷을 만들어 전송한 것이다. 우선 -t 로 ARP 타입을 지정해 주고
-A 1 은 ARP Request 를 뜻하고 -x 는 보내는 IP 주소 -X 보내는 이더넷 주소를 정의한 것이다.

# packit -t arp -A 1 -x 1.2.3.4 -X 5:4:3:2:1:0  
Mode:  Packet Injection using device: eth1

ARP header:  Type: Request(1)
    Sender:  Protocol Address: 1.2.3.4  Hardware Address: 5:4:3:2:1:0
    Target:  Protocol Address: 0.0.0.0  Hardware Address: 0:0:0:0:0:0


Writing packet(s) (1): .

-| Packet Injection Statistics |--------------------------------------------
Injected: 1  Packets/Sec: 1.0  Bytes/Sec: 42.0  Errors: 0

여기서는 간단한 형태로만 만들어 패킷을 전송하지만, 사용하고자 하는 목적에 따라서
다양하게 만들어 볼 수 있다. 옵션을 여러개 사용하여 복잡해 보이지만,
막상 사용해 보면 옵션등이 사용하려는 목적을 대충 추정해 볼 수 있어 심플하게 패킷을 전송할 수 있다.

여기 블로그에서 언급한 많은 도구들 중에서 어떤것이 자기에게 더욱 적합한지는 여러분들이 판단하길 바란다


IDS 로 많이 사용중인 오픈소스 스노트가 있다. 스노트로 제작된 관련 탐지 룰도 많이 찾아 볼 수 있고, 실제 무료/상업용 침입차단 패턴이 이 스노트 형태의 기반이 많다. 여기서 스노트를 다룰 것은 아니다. 다만, 패킷 분석이 많이 사용되는 영역중에 하나로 어떤 위협을 차단/탐지 하기 위한 패턴 작성을 빼 놓을 수 없다.

네트워크 상에서 흘러다니는 트래픽을 정확히 분석 판단하고 어떤 부분을 패턴으로 뽑아내어 사용할 것인가는 단순한 것부터 복잡한 것까지 다양하다.

시그너처 패턴 작성 후 올바로 탐지하는 것을 테스트 하기 위해 트래픽을 재 전송해 보고 한다. 이미 여기서 언급한 tcpreplay 나 기타 도구를 이용해 재전송해보는 것으로 내가 만든 패턴이 올바른지 확인할 수 있다.

앞서 소개한 PackIt 도구에서 유용한 유틸리티가 하나 있다. 그것은 스노트 룰을 PackIt 명령어로 만들어, 패킷을 전송할 수 있도록 도와주는 것이다. 스노트 룰의 QA 등과 같은 업무에는 나름 유용하게 사용할 수 있을 것이다.

다운로드는 다음의 경로에서 가능하다.

http://packetfactory.openwall.net/projects/packit/s2pgen.pl

이 파일은 펄(Perl) 스크립트로 간단히 만들어져 있는 것으로 룰 파일을 지정하면, packit 으로 검증해 볼 수 있게 명령어를 만들어 준다. 파일을 열어 첫 시작부분을 보면 주소 설정을 정의하는 부분이 있다. 시그너처 파일에서 룰을 읽어들여 파싱할때 필요한 기본 정보이다. 이 정보들만 여러분들의 네트워크 상황에 맞게끔만 조절하여 사용하면 된다.


# Defaults
$DEFAULT_PACKIT     = "packit";
$DEFAULT_ADDR       = "10.0.0.1";
$DEFAULT_DATA       = "R";

# Host/Port definitions
$EXTERNAL_NET_ADDR  = "10.0.0.1";
$HOME_NET_ADDR      = "192.168.0.4";
$HTTP_SERVER_ADDR   = "192.168.0.2";
$SQL_SERVER_ADDR    = "192.168.0.3";
$SMTP_SERVER_ADDR   = "192.168.0.4";
$TELNET_SERVER_ADDR = "192.168.0.5";
$AIM_SERVER_ADDR    = "192.168.0.6";
$ORACLE_PORT        = "1521";
$HTTP_PORT          = "80";
$SHELLCODE_PORT     = "81";

우선 스노트에서 제공하는 기본 룰 파일중 하나인 ddos.rules 파일을 가지고 만들어 보면 아래와 같다 :


# ./s2pgen.pl ddos.rules
echo

echo DDOS TFN Probe
packit -t icmp -s10.0.0.1 -d192.168.0.4 -p "0x 31 32 33 34" -SR -DR    -K 8  -N 678

echo DDOS tfn2k icmp possible communication
packit -t icmp -s10.0.0.1 -d192.168.0.4 -p "0x 41 41 41 41 41 41 41 41 41 41" -SR -DR    -K 0  -N 0

echo DDOS Trin00 Daemon to Master PONG message detected
packit -t udp -s10.0.0.1 -d192.168.0.4 -p "0x 50 4f 4e 47" -SR -D31335 

echo DDOS TFN client command BE
packit -t icmp -s10.0.0.1 -d192.168.0.4  -SR -DR    -K 0  -N 456 -Q 0


packit 을 통해 보내기 전 echo 로 어떤 패킷인지 출력해 주고 packit 명령어로 전송할 패킷 정보를 만들어 준다. 그리고, 스노트에서 탐지가 되는지 확인해 보면 된다.

시그너처 제작 업무를 하는 이들에겐 나름 도움이 될 것이다. 또는 이를 변형하여 원하는 형태의 도구를 이용하여 만들어보는 것은 어떨까?
 

// www.packetinside.com/search?updated-max=2011-01-01T21:14:00%2B09:00&max-results=7 


tcpdump 에서 -xX 와 같이 출력되는 형태의 데이터를 가져오고자 한다.

$ tcpdump -xX -n -r test.pcap

에서 출력되는 다음의 내용을 대상으로 가정해 보겠다.


0x0000:  4500 003e 344e 4000 4011 5d49 c0a8 00f0  E..>4N@.@.]I....
0x0010:  a87e 3f01 bddb 0035 002a 7cef 8555 0100  .~?....5.*|..U..
0x0020:  0001 0000 0000 0000 0377 7777 0667 6f6f  .........www.goo
0x0030:  676c 6502 636f 026b 7200 001c 0001       gle.co.kr.....

대략 추정되는 것과 같이 DNS  패킷이다.  자, 그럼 일단 Scapy 를 실행하고 'IP(import_hexcap())' 를 이용해서 패킷 HEX 데이터를 로드해 보자. tcpdump 의 텍스트 내용을 복사하고 import_hexcap() 를 수행후 그 상태에서, 바로 붙여 넣기를 한다. 그리고 Ctrl+D 를 누른다. Ctrl+C 를 누르면 안된다. 붙여 넣기가 완료되면 그 아래에 바로 해당 값들이 변환되어 Scapy 에서 보기 쉽게 표현해 준다.

Welcome to Scapy (2.1.0)
>>> IP(import_hexcap())
        0x0000:  4500 003e 344e 4000 4011 5d49 c0a8 00f0  E..>4N@.@.]I....
0x0010:  a87e 3f01 bddb 0035 002a 7cef 8555 0100  .~?....5.*|..U..
0x0020:  0001 0000 0000 0000 0377 7777 0667 6f6f  .........www.goo
0x0030:  676c 6502 636f 026b 7200 001c 0001       gle.co.kr.....
^D
<IP  version=4L ihl=5L tos=0x0 len=62 id=13390 flags=DF frag=0L ttl=64 proto=udp chksum=0x5d49 src=192.168.0.240 dst=168.126.63.1 options=[] |<UDP  sport=48603 dport=domain len=42 chksum=0x7cef |<DNS  id=34133 qr=0L opcode=QUERY aa=0L tc=0L rd=1L ra=0L z=0L rcode=ok qdcount=1 ancount=0 nscount=0 arcount=0 qd=<DNSQR  qname='www.google.co.kr.' qtype=AAAA qclass=IN |> an=None ns=None ar=None |>>>
>>>


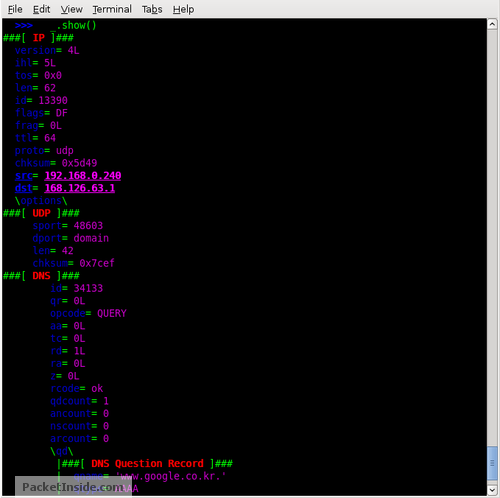
한눈에 보기 쉽게 정리가 된다. 자, 그럼 이제 무엇을 할 수 있겠는가? 이렇게 로드가 되었다면 이제 이 데이터는 내 마음대로 수정이 가능한 것이다. 데이터는 원하는 형태로 조정하고 전송시킬 수도 있게 되는 것이다. 예를 들어, 아래 그림과 같이 _.show() 해서 보면 패킷 구조를 한눈에 쉽게 파악할 수도 있다.


만약 특정 값을 수정한다면 아래와 같이 쉽게 할 수도 있다. 로드한 값을 a 에 저장하고 UDP 의 목적지 포트인 53을 9999로 변경해 보고 확인한 것이다.

>>> a[UDP].dport
53
>>> a[UDP].dport = 9999
>>> a
<IP  version=4L ihl=5L tos=0x0 len=62 id=13390 flags=DF frag=0L ttl=64 proto=udp chksum=0x5d49 src=192.168.0.240 dst=168.126.63.1 options=[] |<UDP  sport=48603 dport=9999 len=42 chksum=0x7cef |<DNS  id=34133 qr=0L opcode=QUERY aa=0L tc=0L rd=1L ra=0L z=0L rcode=ok qdcount=1 ancount=0 nscount=0 arcount=0 qd=<DNSQR  qname='www.google.co.kr.' qtype=AAAA qclass=IN |> an=None ns=None ar=None |>>>


Scapy 의 활용도는 무궁무진 하다. 패킷 데이터를 쉽고, 간단하게 처리할 수 있으니 이 얼마나 편하던가 :-) 앞으로도 Scapy 기능에 대해서 가끔씩 소개할 예정이다.

// www.packetinside.com/search?updated-max=2011-06-02T00:51:00%2B09:00&max-results=7


+ Recent posts